
Are you a fan of the tangy and creamy flavor of buttermilk? If so, why not try making your own at home? Making buttermilk from scratch is not only a cost-effective alternative to buying it from the store, but it also allows you to customize the taste and texture according to your preference. In this blog article, we will provide you with a detailed and comprehensive guide on how to make buttermilk, from choosing the right ingredients to the step-by-step process. So, put on your apron and let's get started!
Understanding Buttermilk: What is it and why make it at home?
Buttermilk is a tangy and slightly acidic dairy product that is commonly used in baking, cooking, and as a refreshing drink. Traditionally, buttermilk is the liquid left behind after churning butter from cream. However, the buttermilk available in stores today is usually made by fermenting milk with lactic acid bacteria.
By making buttermilk at home, you have control over the quality of the ingredients and the fermentation process, resulting in a fresher and more flavorful product. Additionally, homemade buttermilk allows you to avoid any additives or preservatives that may be present in store-bought options. Whether you enjoy using buttermilk in pancakes, biscuits, or salad dressings, making it yourself will elevate the taste and ensure a truly homemade experience.
Gathering the Ingredients: What you'll need for homemade buttermilk
To make buttermilk at home, you'll need just a few simple ingredients. The main ingredient is milk, preferably whole milk for a richer buttermilk. You can choose between cow's milk, goat's milk, or even plant-based milk alternatives such as almond milk or soy milk.
In addition to milk, you'll need a starter culture or an acidifying agent. The traditional method involves using a starter culture, which can be obtained from a previous batch of buttermilk or a commercial buttermilk culture. Alternatively, you can acidify the milk by adding an acid such as lemon juice or vinegar. This method is known as the acidulated method and is a convenient option if you don't have access to a starter culture.
You will also need a clean glass jar or container with a tight-fitting lid to ferment the milk. Ensure that the container is sterilized and free of any residues that could interfere with the fermentation process. Lastly, a clean whisk or spoon for stirring the mixture is necessary.
Choosing the Method: Cultured vs. acidulated buttermilk
When it comes to making buttermilk, there are two primary methods: the cultured method and the acidulated method. Both methods result in delicious buttermilk, but they differ in the way the milk is fermented and acidified.
The Cultured Method
The cultured method involves using a starter culture, which can be obtained from a previous batch of buttermilk or a commercial buttermilk culture. This starter culture contains lactic acid bacteria that ferment the milk and give it its distinct tangy flavor. The bacteria consume the lactose in the milk and produce lactic acid, which gives buttermilk its characteristic acidity.
To make buttermilk using the cultured method, you will need to add the starter culture to the milk and allow it to ferment at a controlled temperature for a certain period. This process allows the bacteria to multiply and acidify the milk, transforming it into buttermilk. The resulting buttermilk can then be used immediately or refrigerated for later use.
The Acidulated Method
The acidulated method is a quicker and more accessible option for making buttermilk at home. Instead of using a starter culture, this method involves acidifying the milk by adding an acid such as lemon juice or vinegar. The acid lowers the pH of the milk, creating an acidic environment that mimics the fermentation process of cultured buttermilk.
To make buttermilk using the acidulated method, you simply add the acidifying agent to the milk and let it sit for a few minutes. During this time, the acid reacts with the milk, causing it to curdle slightly and develop a tangy flavor. The resulting mixture can be used immediately as buttermilk in your recipes.
Making Buttermilk with Cultured Method: Step-by-step instructions
Now that you understand the basics, let's dive into the step-by-step process of making buttermilk using the cultured method. Follow these instructions to create your own tangy and creamy buttermilk:
Step 1: Gather the Ingredients
Before you begin, make sure you have all the necessary ingredients ready. You will need:
- 4 cups of milk (whole milk is preferred)
- 1/4 cup of buttermilk (starter culture)
Step 2: Sterilize the Equipment
Ensure that the glass jar or container and whisk or spoon you will be using are clean and sterilized. This helps promote a healthy fermentation process and prevents any unwanted contaminants from affecting the buttermilk.
Step 3: Warm the Milk
Pour the milk into a saucepan and heat it gently over low heat. Warm the milk to around 110°F (43°C). This temperature is ideal for activating the bacteria in the starter culture and promoting fermentation.
Step 4: Add the Starter Culture
Once the milk reaches the desired temperature, remove it from the heat. Add the buttermilk (starter culture) to the warm milk and whisk gently to ensure it is evenly incorporated.
Step 5: Ferment the Mixture
Pour the mixture into the sterilized glass jar or container and cover it with a tight-fitting lid. Place the jar in a warm spot, such as a kitchen cupboard or a turned-off oven. The ideal fermentation temperature is around 70-77°F (21-25°C). Allow the mixture to ferment for 12-24 hours, depending on the desired level of tanginess. The longer the fermentation, the tangier the buttermilk will be.
Step 6: Check for Fermentation
After the fermentation period, check if the mixture has thickened slightly and has a tangy aroma. A spoonful of the mixture should have a creamy texture with a pleasant sour taste. If it meets these criteria, your homemade buttermilk is ready to use or refrigerate. If not, you may need to allow it to ferment for a bit longer.
Making Buttermilk with Acidulated Method: Step-by-step instructions
If you prefer a quicker method for making buttermilk, the acidulated method is the way to go. Follow these steps to create acidified buttermilk:
Step 1: Gather the Ingredients
Before you begin, make sure you have all the necessary ingredients ready. You will need:
- 4 cups of milk (whole milk is preferred)
- 1/4 cup of acidifying agent (lemon juice or vinegar)
Step 2: Sterilize the Equipment
Ensure that the glass jar or container and whisk or spoon you will be using are clean and sterilized. This helps maintain the cleanliness of the buttermilk and prevents any unwanted flavors or contaminants.
Step 3: Warm the Milk
Pour the milk into a saucepan and heat it gently over low heat. Warm the milk to around 110°F (43°C). This temperature helps the acidifying agent react with the milk effectively.
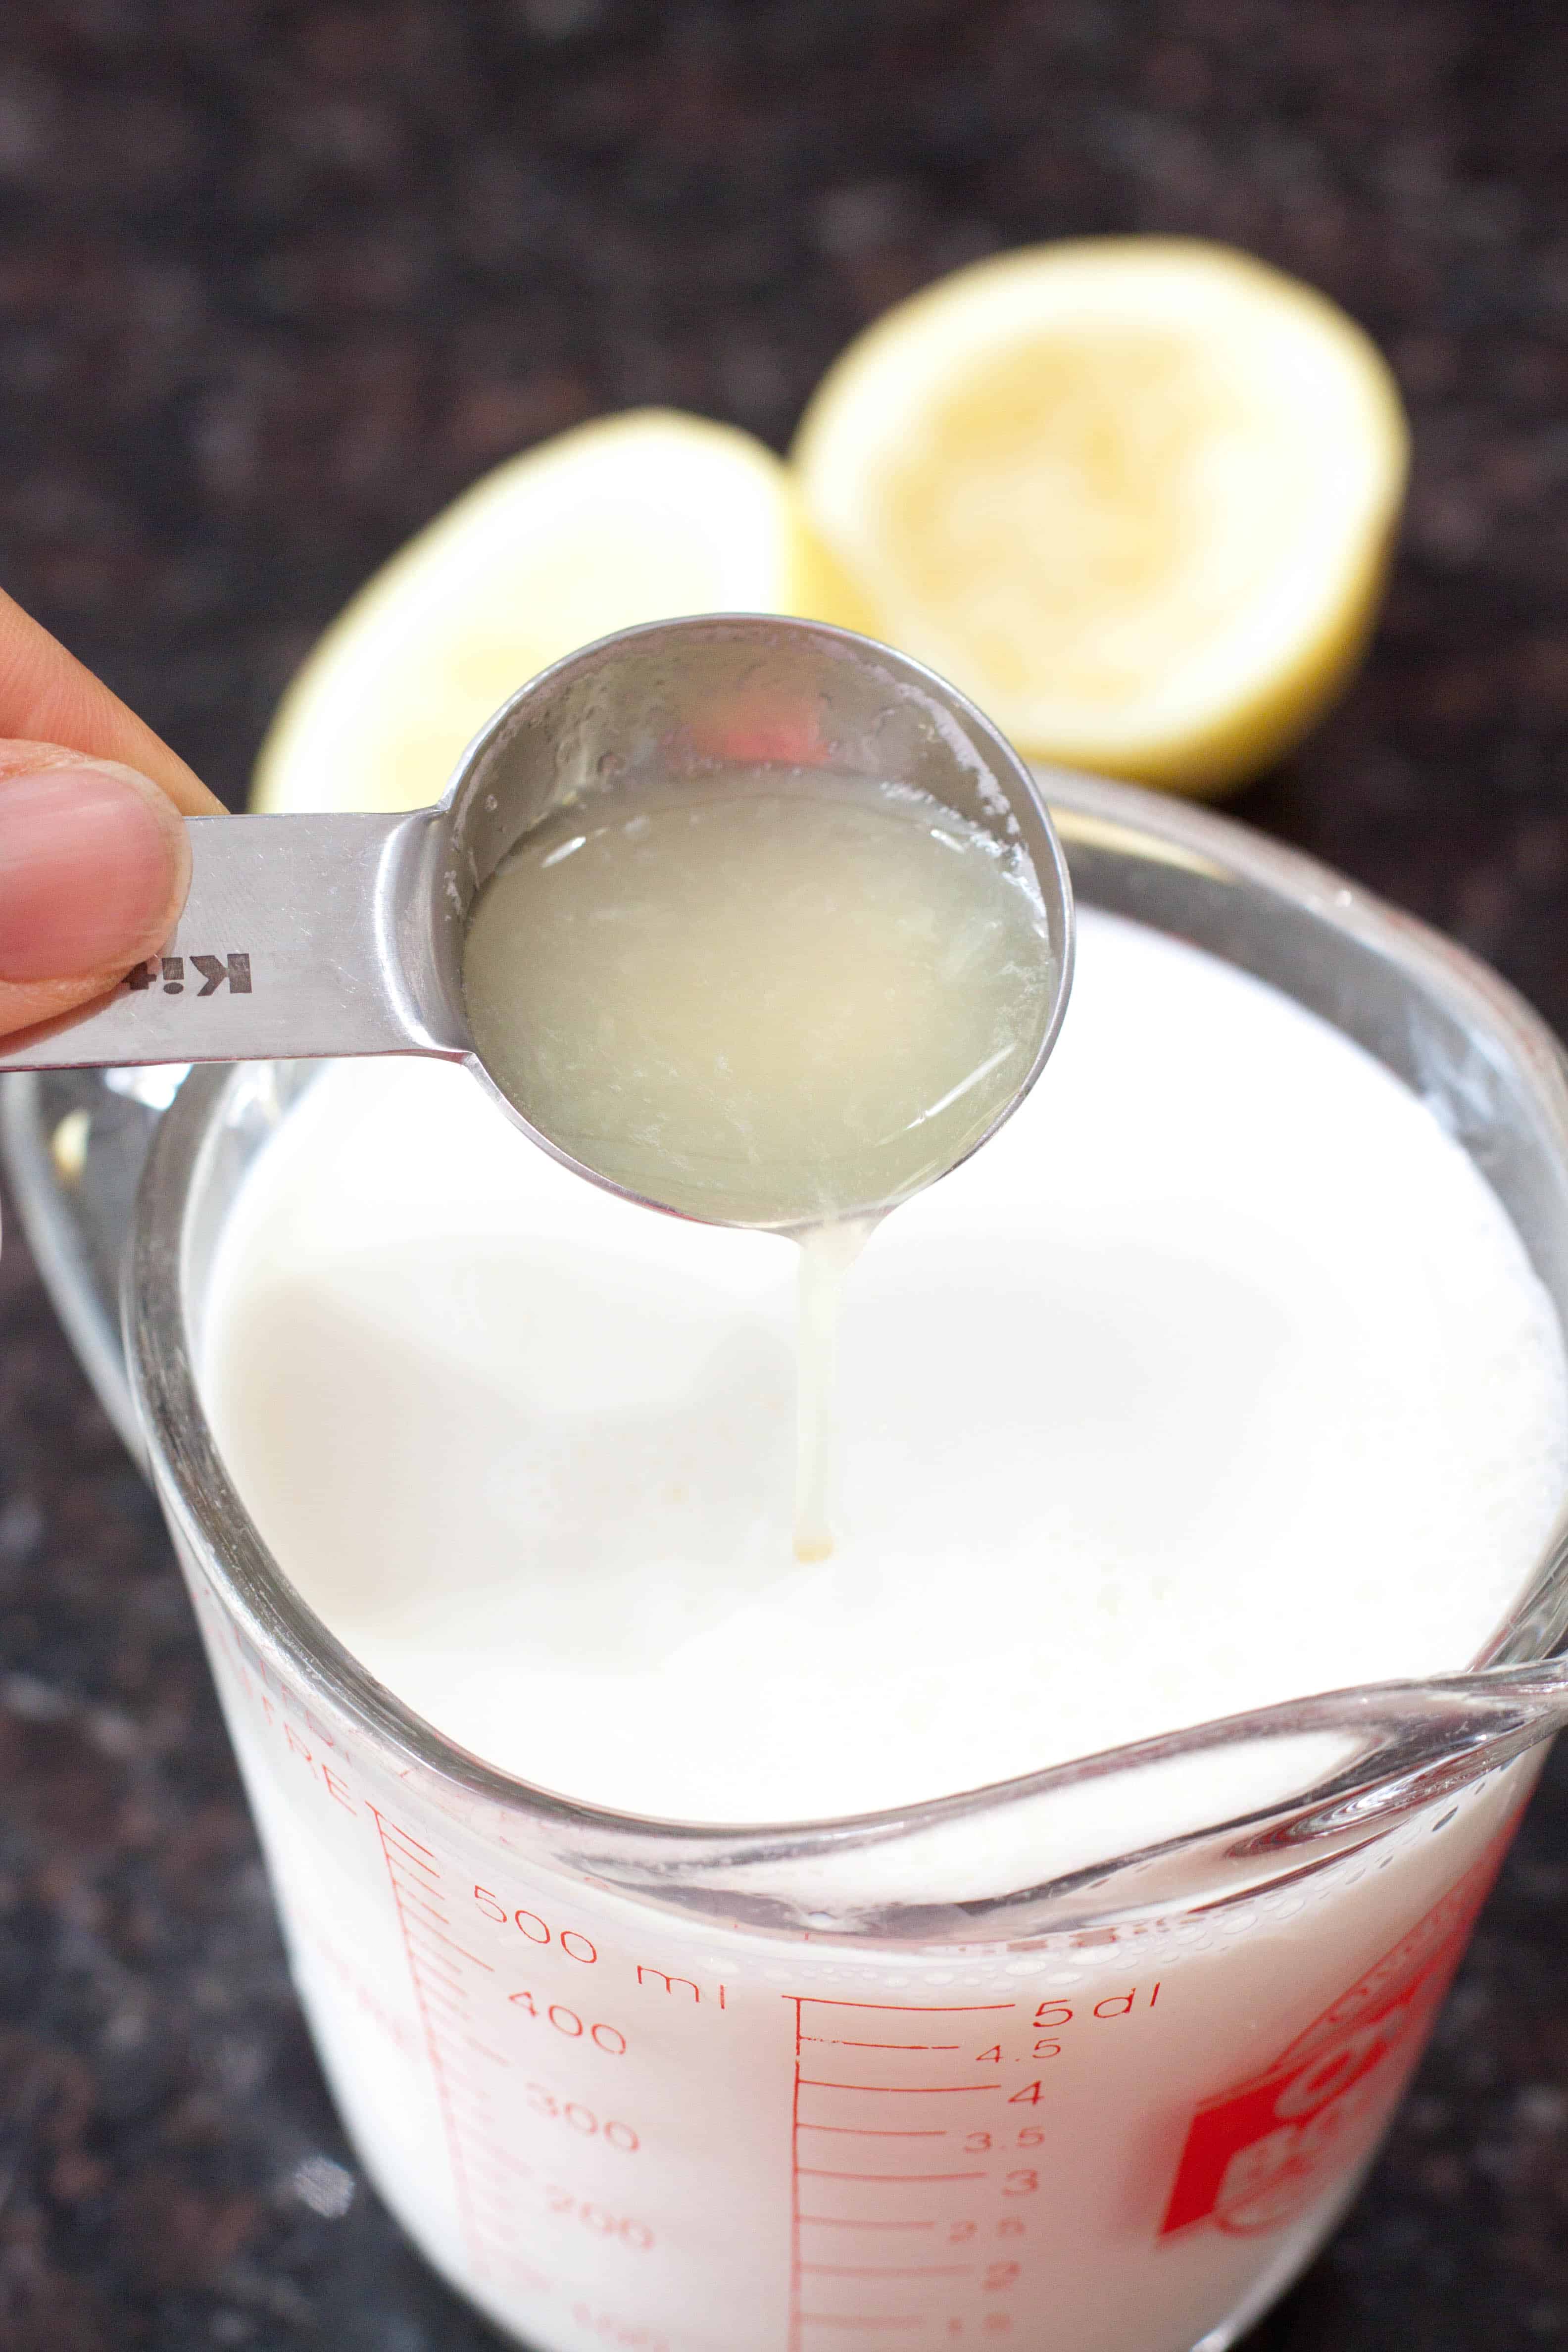
Step 4: Add the Acidifying Agent
Once the milk reaches the desired temperature, remove it from the heat. Add the acidifying agent (lemon juice or vinegar) to the warm milk and stir gently. Ensure that the acid is evenly distributed throughout the milk.
Step 5: Allow the Mixture to Curdle
Let the mixture sit at room temperature for about 10-15 minutes. During this time, the acid will react with the milk and cause it to curdle. The milk will thicken slightly, and you will notice small curds forming.
Step 6: Check the Consistency and Flavor
After the curdling process, check the consistency and flavor of the mixture. It should have a slightly thickened texture with a tangy taste similar to traditional buttermilk. If it meets these criteria, your acidulated buttermilk is ready to use in your recipes.
Troubleshooting: Common issues and solutions when making buttermilk
While making buttermilk at home is relatively straightforward, you may encounter some common issues along the way. Here are a few troubleshooting tips and solutions to help you overcome any problems:
Issue 1: Buttermilk doesn't thicken or develop a tangy flavor
Solution: This is usually caused by insufficient fermentation time. Extend the fermentation period by a few hours or overnight to allow the bacteria to sufficiently acidify the milk. Check the consistency and flavor periodically until you achieve the desired results.
Issue 2: Buttermilk has a foul smell or off-putting taste
Solution: This could be due to contamination during the fermentation process. Ensure that all equipment and utensils are properly sterilized before use. Also, make sure to use fresh, high-quality ingredients to minimize the risk of spoilage. If the buttermilk smells or tastes unpleasant, it's best to discard it and start a new batch.
Issue 3: Buttermilk becomes too thick or separates into curds and whey
Solution: This may occur if the fermentation temperature is too high or if the buttermilk is left to ferment for an extended period. To avoid this, monitor the fermentation temperature closely and adjust as necessary. Stick to the recommended fermentation time to ensure a smooth and creamy buttermilk consistency.
Storing and Preserving Buttermilk: Tips for freshness and longevity
Once you have successfully made your buttermilk, it's important to store and preserve it properly to maintain its freshness and extend its shelf life. Here are some helpful tips:
Refrigeration
Buttermilk should be stored in the refrigerator to slow down the fermentation process and maintain its quality. Transfer the buttermilk to a clean, airtight container and place it in the coldest part of your refrigerator, typically the back. The low temperature will help prolong its freshness.
Shelf Life
Homemade buttermilk can typically be stored in the refrigerator for up to 2 weeks. However, its taste and texture may change over time, becoming slightly more acidic and thicker. It's best to use it within the first week for optimal flavor and consistency.
Freezing
If you have a surplus of buttermilk or want to extend its shelf life further, you can freeze it. Pour the buttermilk into freezer-safe containers, leaving some headspace for expansion. Seal the containers tightly and label them with the date. Buttermilk can be frozen for up to 3 months. Thaw it in the refrigerator overnight before use, and give it a good shake or stir to reincorporate any separated liquid.
Using Buttermilk in Cooking and Baking: Delicious recipes and ideas
Buttermilk is an incredibly versatile ingredient that adds a delightful tang and moisture to a wide range of dishes. Here are some delicious recipes and creative ideas to inspire you:
1. Fluffy Buttermilk Pancakes
Start your day off right with a stack of fluffy buttermilk pancakes. The acidity of the buttermilk helps activate the leavening agents, resulting in light and airy pancakes. Serve them with your favorite toppings, such as maple syrup, fresh berries, or whipped cream.
2. Buttermilk Fried Chicken
Marinating chicken in buttermilk before frying is a game-changer. The buttermilk tenderizes the meat and imparts a tangy flavor, while also creating a crispy and golden crust. Add your favorite herbs and spices to the buttermilk marinade for an extra kick of flavor.
3. Buttermilk Biscuits
Buttermilk biscuits are a classic comfort food that pairs perfectly with savory dishes or as a base for sandwiches. The acidity of the buttermilk reacts with the leavening agents, resulting in tender, flaky biscuits. Serve them warm with butter or gravy for a mouthwatering treat.
4. Buttermilk Ranch Dressing
Elevate your salads and vegetable dips with homemade buttermilk ranch dressing. The tanginess of the buttermilk complements the herbs and spices, creating a creamy and flavorful dressing. Customize the recipe by adding garlic, chives, or even a dash of hot sauce for an extra kick.
5. Buttermilk Waffles
Indulge in crispy yet fluffy waffles made with buttermilk. The acidity of the buttermilk helps create a tender interior while achieving a crispy exterior. Top your waffles with fresh fruit, whipped cream, or a drizzle of your favorite syrup for a delightful breakfast or brunch.
Health Benefits of Buttermilk: Nutritional value and potential advantages
Buttermilk not only adds flavor and texture to dishes but also offers several health benefits. Here are some potential advantages of incorporating buttermilk into your diet:
Nutritional Value
Buttermilk is a good source of essential nutrients such as calcium, vitamin B12, riboflavin, and phosphorus. These nutrients contribute to bone health, red blood cell production, energy metabolism, and overall well-being.
Digestive Health
The probiotics present in buttermilk, which are beneficial bacteria, can help promote a healthy gut. They aid in digestion, support the growth of beneficial gut bacteria, and may alleviate digestive issues such as bloating and constipation.
Hydration
Buttermilk has a high water content, making it a hydrating beverage option. It contains electrolytes such as potassium, which helps maintain fluid balance in the body. Enjoy a glass of buttermilk on a hot day to stay refreshed and replenished.
Bone Health
The calcium and phosphorus content in buttermilk contribute to strong bones and teeth. Regular consumption of buttermilk, along with a balanced diet, can help support bone health and reduce the risk of conditions like osteoporosis.
Frequently Asked Questions: Common inquiries about making buttermilk
Here are some commonly asked questions regarding making buttermilk at home:
1. Can I use low-fat milk or skim milk to make buttermilk?
Yes, you can use low-fat milk or skim milk to make buttermilk. However, keep in mind that the resulting buttermilk may have a slightly thinner consistency and less richness compared to using whole milk. Adjust the fermentation time accordingly, as low-fat milk may ferment faster.
2. Can I use plant-based milk alternatives to make buttermilk?
Yes, you can use plant-based milk alternatives such as almond milk, soy milk, or coconut milk to make buttermilk. However, the resulting buttermilk may have a different taste and texture compared to traditional buttermilk. Experiment with different plant-based milks and fermentation times to achieve the desired flavor and consistency.
3. Can I make buttermilk without an acidifying agent or starter culture?
No, an acidifying agent or starter culture is necessary to make buttermilk. They are essential for creating the characteristic tangy flavor and thickened consistency of buttermilk. However, you can make a buttermilk substitute by combining milk with an acid such as lemon juice or vinegar. This substitute may not have the same complexity of flavor as traditional buttermilk but can work well in certain recipes.
4. Can I use homemade buttermilk as a substitute for store-bought buttermilk in recipes?
Yes, homemade buttermilk can be used as a substitute for store-bought buttermilk in recipes. They are typically interchangeable, as both provide the same tangy flavor and acidity. However, keep in mind that the consistency of homemade buttermilk may vary slightly, so adjust the recipe as needed.
In conclusion, making buttermilk at home is a rewarding and enjoyable experience. By following our detailed guide, you can create your own delicious buttermilk with ease and customize it according to your taste preference. Whether you choose the cultured or acidulated method, the end result will be a tangy and creamy delight that can enhance your favorite recipes. So, why not give it a try and savor the satisfaction of homemade buttermilk? Your taste buds will thank you!
Comments
Post a Comment