
Chromebooks have gained immense popularity in recent years due to their user-friendly interface and affordability. One common task that users often need assistance with is taking screenshots on their Chromebook. Whether you want to capture an important moment, save an error message, or simply share something interesting, knowing how to take screenshots efficiently is essential. In this article, we will guide you through the process of taking screenshots on a Chromebook, providing you with a detailed and comprehensive understanding of the various methods available.
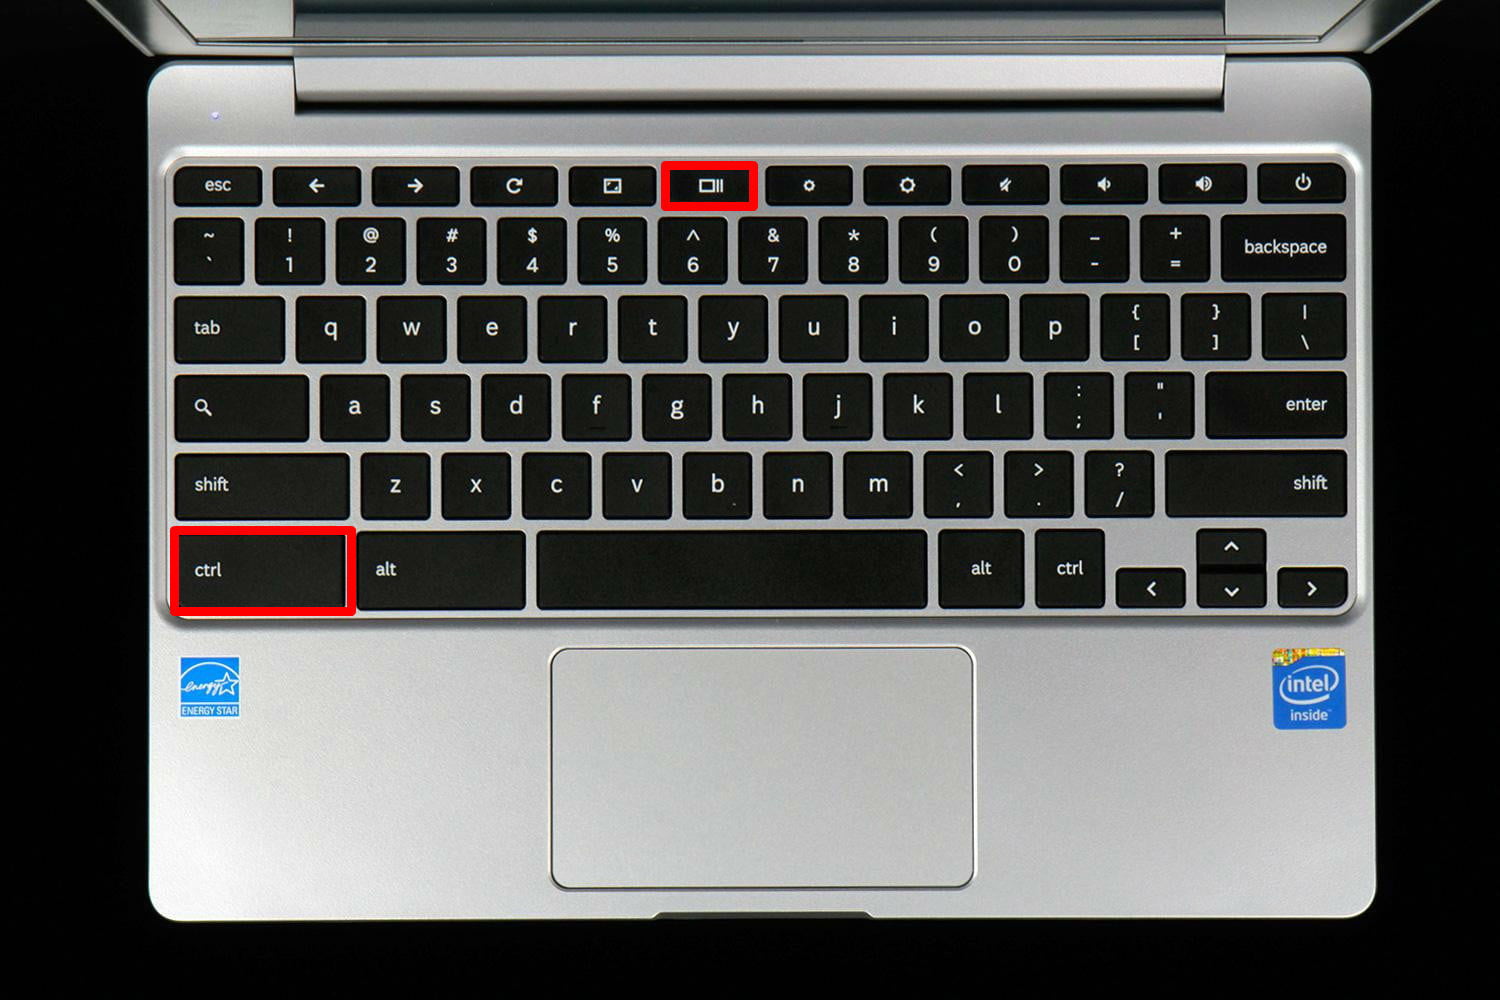
Before we delve into the different methods of taking screenshots on a Chromebook, it's important to familiarize yourself with the keyboard layout. Most Chromebooks feature a dedicated "show all windows" key, which looks like a rectangle with two lines on the right side. Additionally, you'll find the Ctrl, Alt, and Shift keys, which are commonly used in conjunction with other keys to perform various functions, including taking screenshots. Now that you're acquainted with the keyboard layout, let's explore the different methods you can use to capture screenshots on your Chromebook.
Using the Keyboard Shortcut
One of the simplest and quickest ways to take a screenshot on a Chromebook is by using a keyboard shortcut. To capture the entire screen, press the Ctrl and "show all windows" keys simultaneously. Your screen will flash momentarily, indicating that the screenshot has been taken. To save the screenshot, navigate to the "Downloads" folder or press the "Ctrl + Alt + M" keys to open the notification center, where you can find and access the screenshot. This method is perfect for capturing full-screen images, web pages, documents, or any other content displayed on your Chromebook.
If you prefer to capture only a specific portion of your screen, you can use the Ctrl, Shift, and "show all windows" keys together. Once pressed, your cursor will transform into a crosshair. Click and drag to select the desired area. As you drag, a rectangle will appear, indicating the portion of the screen you've selected. Release the mouse button to capture the screenshot. Similar to capturing the entire screen, you can find and access the screenshot in your "Downloads" folder or the notification center. This method is particularly useful when you want to highlight specific details or crop out unnecessary elements from your screenshot.
Saving Screenshots to the Clipboard
In addition to saving the screenshot directly to your device, Chromebooks offer the option to save screenshots to the clipboard. This allows you to easily paste the image into other applications or documents without the need to first save it as a file. To save a screenshot to the clipboard, press the Ctrl + Shift + "show all windows" keys simultaneously. The screenshot will be copied to the clipboard, and you can then paste it into an email, document, or any other application that supports image insertion. This method is efficient if you want to quickly share your screenshot or make annotations using a separate image editing tool.
Using the Power and Volume Down Buttons
If you're using a Chromebook with a touchscreen, an alternative method for taking screenshots is by utilizing the power and volume down buttons. Locate the power button, usually located on the side of the device, and the volume down button, typically found on the opposite side. To capture a screenshot, press and hold the power button, then quickly press the volume down button. Your screen will flash, indicating that the screenshot has been taken. Similar to the previous methods, you can find and access the screenshot in your "Downloads" folder or the notification center. This method is particularly convenient for touchscreen users or those who prefer physical buttons over keyboard shortcuts.
Taking Screenshots of Specific Windows
While the previous methods allow you to capture the entire screen or a specific portion, you might encounter situations where you only want to capture a particular window, even if it's hidden or minimized. Chromebooks provide a simple solution for this. Press the Alt + "show all windows" keys together. Your cursor will transform into a camera icon. Click on the window you wish to capture, and a screenshot of that specific window will be taken. Similar to the previous methods, you can access the screenshot in your "Downloads" folder or the notification center. This method is ideal for capturing specific application windows, error messages, or any other content displayed within a single window.
Editing Screenshots
Once you have captured a screenshot on your Chromebook, you may want to edit it before sharing or saving it. Chromebooks offer several built-in editing options to enhance and personalize your screenshots. After taking a screenshot, a small preview of the image will appear in the bottom-right corner of your screen. Click on the preview to open the image editor. Within the editor, you can crop, rotate, resize, or add annotations to your screenshot. Additionally, you can apply various filters, adjust brightness and contrast, and even draw freehand on the image. Once you're satisfied with the edits, click "Save" to save the image to your "Downloads" folder or choose "Save As" to specify a different location.
Using the Screenshot Tool
In addition to the keyboard shortcuts and editing options, Chromebooks also provide a built-in screenshot tool, which offers more advanced features and functionalities. To access the screenshot tool, press the "Ctrl + Shift + Show all windows" keys simultaneously. A small toolbar will appear at the bottom of the screen, providing you with various options. From the toolbar, you can choose to capture the entire screen, a specific window, or a selected area. You can also enable or disable the cursor capture, countdown timer, or even delay the screenshot capture. Once you've chosen your desired settings, click the "Capture" button to take the screenshot. The image will be saved in the "Downloads" folder or the notification center, depending on your Chromebook's settings.
Saving Screenshots to Google Drive
If you frequently use Google Drive for storing and managing your files, you can configure your Chromebook to automatically save screenshots directly to your Google Drive. To set up this feature, click on the clock in the bottom-right corner of your screen, then click on the gear icon to access the settings menu. From the menu, select "Google Drive" and toggle the switch to enable the option to save screenshots to your Drive. With this setting enabled, every time you capture a screenshot, it will be automatically saved to a designated folder in your Google Drive. This allows you to easily access and share your screenshots across multiple devices and collaborate with others.
Troubleshooting Screenshot Issues
While capturing screenshots on a Chromebook is generally straightforward, you may encounter certain issues or obstacles along the way. Here are some common problems and their solutions:
Screenshot Not Saving:
If you're unable to find your screenshots in the "Downloads" folder or the notification center, ensure that your Chromebook's storage isn't full. Clearing unnecessary files or transferring them to an external storage device can help free up space and allow your screenshots to save properly. Additionally, check your Chromebook's settings to ensure that the default location for saving screenshots hasn't been changed.
Screen Flashing Issue:
In rare cases, you may experience a screen flashing issue when attempting to take a screenshot. This can be resolved by performing a powerwash, which is essentially a factory reset for your Chromebook. However, be aware that this will erase all data and restore your Chromebook to its original settings. Before proceeding with a powerwash, ensure that you have backed up any important files or data that you wish to keep.
Partial Screenshot Not Working:
If you're having trouble capturing a partial screenshot using the keyboard shortcut, try using the touchscreen method instead. Press and hold the screen with your finger or stylus, then drag to select the desired area. Releasing your finger or stylus will capture the screenshot.
In conclusion, knowing how to take screenshots on a Chromebook is a valuable skill that can greatly enhance your productivity and facilitate effective communication. By following the methods and techniques outlined in this article, you will be able to capture and save screenshots effortlessly, whether for personal or professional use. From using keyboard shortcuts and the power and volume buttons to accessing advanced editing options and utilizing the built-in screenshot tool, Chromebooks offer a range of features to cater to your specific needs. So, grab your Chromebook and let's dive into the world of screenshotting!
Comments
Post a Comment